SAP C_S4CPB_2602 Exam Questions Preparation Material By VerifiedDumps
Wiki Article
Starting from our C_S4CPB_2602 practice materials will make a solid foundation for your exam definitively. Do not satisfied with using shortcuts during your process, regular practice with our C_S4CPB_2602 exam prep will be easy. Tens of thousands of people has achieved success with our C_S4CPB_2602study questions, you can absolutely do it. And you will find that passing the C_S4CPB_2602 exam is as easy as pie.
The core competitiveness of the C_S4CPB_2602 exam practice questions, as users can see, we have a strong team of experts, the C_S4CPB_2602 study materials are advancing with the times, updated in real time. Through user feedback recommendations, we've come to the conclusion that the C_S4CPB_2602 learning guide has a small problem at present, in the rest of the company development plan, we will continue to strengthen our service awareness, let users more satisfied with our C_S4CPB_2602 Study Materials, we hope to keep long-term with customers, rather than a short high sale.
>> Test C_S4CPB_2602 Collection <<
SAP C_S4CPB_2602 Dumps - Shortcut To Success [Updated-2026]
We boost the professional and dedicated online customer service team. They are working for the whole day, weak and year to reply the clients' question about our C_S4CPB_2602 study question and solve the clients' problem as quickly as possible. If the clients have any problem about the use of our C_S4CPB_2602 Exam Practice materials and the refund issue they can contact our online customer service at any time, our online customer service personnel will reply them quickly. So you needn’t worry about you will encounter the great difficulties when you use our C_S4CPB_2602 test pdf.
SAP Certified - Implementation Consultant - SAP S/4HANA Cloud Public Edition (C_S4CPB_2602) Sample Questions (Q19-Q24):
NEW QUESTION # 19
SIMULATION
Migrate Bank Data
Business Scenario
You are responsible for migrating bank data into the SAP S/4HANA Cloud Public Edition system. You have determined the best method is Migrate Data Using Staging Tables, as you only have a couple banks to migrate.
Prerequisites:
Note:
In the task below, always replace ###### with the last 6 digits of your group number.
Note:
Make sure to use the EXACT names/values/spaces as they are listed in the task. Even forgetting a space or a number will cause the validation of the task to fail and be marked as incorrect.
Task:
Use the correct app to verify your data has been migrated successfully (see the documentation for the Bank migration object).
Answer:
Explanation:
See Explanation below for all solution
Explanation:
Objective
The purpose of this task is to use the correct SAP app to verify that the bank master data migrated in the previous task was created successfully in the target system.
The correct verification app is:
Manage Banks - Master Data
SAP's documentation for bank maintenance assigns this app to the bank master data role and uses it for maintaining and checking bank records, which matches the verification step after migration.
Business Scenario Explanation
In the previous migration tasks, you:
created the migration project,
selected the Bank migration object,
prepared and uploaded the bank data,
validated and transferred it to staging tables,
completed mapping tasks,
migrated the two bank records.
However, a migration is not considered complete until the data is verified in the target application used for ongoing business maintenance.
For the Bank migration object, that target verification app is:
Manage Banks - Master Data
This app allows you to search for the migrated banks and confirm that the data now exists in SAP S/4HANA Cloud Public Edition.
Important Notes
Always replace ###### with the last 6 digits of your group number.
Use the exact bank values that were migrated.
Verification must be done in the correct app, not only in the migration cockpit.
The expected bank records are the two banks from the previous task.
Correct Verification App
Purpose
App
Verify migrated bank master data
Manage Banks - Master Data
SAP documents that bank master maintenance is handled through the bank master data application and the associated bank maintenance role/catalog, which is why this is the correct end-user verification app after bank migration.
Data to Verify
You should verify the two migrated banks:
Bank 1
Bank Country/Region = US
Bank Key = A######
Bank Name = Bank of A######
Bank 2
Bank Country/Region = US
Bank Key = Z######
Bank Name = Bank of Z######
Example
If your suffix is 000013, verify:
US / A000013 / Bank of A000013
US / Z000013 / Bank of Z000013
Detailed Step-by-Step Procedure
Step 1: Return to the SAP Fiori launchpad
After finishing the migration:
Go back to the SAP S/4HANA Cloud homepage.
Explanation:
The verification must be performed in the target business app, not only from the migration results screen.
Step 2: Open the app "Manage Banks - Master Data"
From the launchpad search:
Search for:
Manage Banks - Master Data
Open the app.
Explanation:
This is the correct app for checking whether the migrated bank master records now exist in the target system.
Step 3: Search for the first migrated bank
In Manage Banks - Master Data:
In Bank Country/Region, enter:
US
In Bank Key, enter:
A######
Click Go
Example
If your suffix is 000013, search for:
Bank Country/Region = US
Bank Key = A000013
Explanation:
This checks whether the first migrated bank was created successfully.
Step 4: Verify the first bank details
Confirm that the search result shows the correct bank record:
Bank Country/Region = US
Bank Key = A######
Bank Name = Bank of A######
You can also verify address data if visible, such as:
Street = West Chester Pike
City = Newtown Square
Explanation:
This confirms that the first bank master record exists in the target system after migration.
Step 5: Search for the second migrated bank
Clear or update the search criteria and enter:
Bank Country/Region = US
Bank Key = Z######
Click Go
Example
If your suffix is 000013, search for:
Bank Country/Region = US
Bank Key = Z000013
Explanation:
This checks whether the second migrated bank was created successfully.
Step 6: Verify the second bank details
Confirm that the second search result shows:
Bank Country/Region = US
Bank Key = Z######
Bank Name = Bank of Z######
You can also verify address data if visible, such as:
Street = Lenox Road
City = Atlanta
Explanation:
This confirms that the second bank master record exists in the target system after migration.
Step 7: Confirm successful verification
If both banks are visible in Manage Banks - Master Data, the migration verification is successful.
Explanation:
This is the final proof that the migration did not only complete technically in the cockpit, but also posted the expected business data into the target application.
Expected Result
After this task is completed successfully:
the app Manage Banks - Master Data is used for verification,
Bank 1 is visible:
US / A###### / Bank of A######
Bank 2 is visible:
US / Z###### / Bank of Z######
the migrated bank data is confirmed as successfully created in the target system.
NEW QUESTION # 20
SIMULATION
Create a Custom Launchpad Space and Page
Business Scenario
You are building a custom business role that will be assigned to all employees in the organization. The business role and its corresponding Launchpad Space and Page need to include the apps that have been granted through the business catalogs assigned to the business role to ensure employees have an easy time finding the relevant applications.
Note: In the task below, always replace ###### with the last 6 digits of your group number.
Note:
Make sure to use the EXACT names/values/spaces as they are listed in the task.
Even forgetting a space or a number will cause the validation of the task to fail and be marked as incorrect.
Task:
Assign the Launchpad Space to your custom business role. Edit the Launchpad Page to add the applications listed below as tiles (standard "preferred" square tile) with the Section Title: Self-Services.
Manage My Timesheet
Concur Travel Expense
Answer:
Explanation:
See Explanation below for all solution
Explanation:
Objective
The purpose of this task is to complete the launchpad setup for the custom all-employee role by:
assigning the custom Launchpad Space to the business role,
editing the Launchpad Page,
creating a section titled Self-Services,
adding the required applications as standard preferred square tiles:
Manage My Timesheet
Concur Travel Expense
Business Scenario Explanation
In the earlier tasks, you created:
a custom all-employee business role,
the required business catalog assignments,
a custom launchpad space and page.
This task completes that setup by adding the actual application tiles that end users will see on the launchpad.
The goal is to make it easy for employees to find the relevant self-service applications without searching manually.
Important Notes
Always replace ###### with the last 6 digits of your group number.
Use the exact values listed in the task.
The section title must be exactly:
Self-Services
The two tiles must be:
Manage My Timesheet
Concur Travel Expense
Save after editing the page.
Prerequisites
Before doing this task, the following should already exist:
custom business role:
Z_EMPLOYEES_ALL_######
assigned business catalogs:
SAP_HCM_BC_EMP_PC
SAP_CON_BC_CTE_ESS_PC
custom launchpad space and page created for the role
page title and description:
General
Detailed Step-by-Step Procedure
Step 1: Open the app "Maintain Business Roles"
From the SAP S/4HANA Cloud launchpad:
Log in to SAP S/4HANA Cloud.
Search for:
Maintain Business Roles
Open the app.
Explanation:
This is the app where the custom all-employee role is maintained. The launchpad space assignment and page navigation are controlled from here.
Step 2: Open the custom all-employee business role
In Maintain Business Roles:
Search for your custom business role:
Z_EMPLOYEES_ALL_######
Open the role.
Example
If your suffix is 000013, the role is:
Z_EMPLOYEES_ALL_000013
Explanation:
You must work in the custom all-employee role because the launchpad space and page belong to this role.
Step 3: Open the Launchpad Spaces tab
Inside the role:
Click:
Launchpad Spaces
Explanation:
This tab shows which launchpad space is assigned to the role.
Step 4: Verify the Launchpad Space is assigned
Check that the assigned space exists.
In your execution, the assigned space followed this pattern:
Z_ALL_EMP_######
Explanation:
The task says to assign the launchpad space to the custom business role.
If the space already appears in the assigned list, then this part is already complete.
If the space is not listed:
Click Add
Create or assign the required custom space
Save the role
Step 5: Open the assigned Launchpad Space
In the assigned launchpad spaces list:
Click the arrow > at the far right of the space row.
Explanation:
This opens Space Details, where the page linked to the space can be accessed.
Step 6: Open the Pages tab
In Space Details:
Click:
Pages
Explanation:
A space can contain one or more pages.
This task requires you to edit the page content.
Step 7: Open the Launchpad Page
In the Pages list:
Open the page row by clicking the arrow > at the far right.
In your run, the page followed this pattern:
Z_ALL_EMP_######
Explanation:
This opens Page Details, where the page content can be edited.
Step 8: Open Page Content
Inside Page Details:
Click the tab:
Page Content
Explanation:
This is the area where sections and application tiles are maintained.
Step 9: Click Edit
On the Page Content screen:
Click Edit
Explanation:
The page must be in edit mode before you can create sections or add app tiles.
Step 10: Enter the section title
In the section title field, enter exactly:
Self-Services
Explanation:
This creates the section in which the required employee self-service app tiles will be placed.
The title must match the task exactly.
Step 11: Add the tile "Concur Travel Expense"
On the right side of the page content screen, in the list of apps derived from the assigned catalogs:
Find:
Concur Travel Expense
Click:
Add
Explanation:
This adds the Concur employee self-service app tile into the Self-Services section.
Step 12: Add the tile "Manage My Timesheet"
Still on the right side app list:
Find:
Manage My Timesheet
Click:
Add
Explanation:
This adds the timesheet app tile into the same Self-Services section.
Step 13: Verify both tiles are visible in the section
After adding both apps, confirm that the page content now shows:
Concur Travel Expense
Manage My Timesheet
under the section:
Self-Services
Explanation:
This confirms the tiles were placed correctly on the page.
Step 14: Save the page
Click:
Save
Explanation:
This finalizes the page changes.
If you do not save, the tiles and section will not be retained.
Step 15: Verify the role is assigned to your business user
To verify the page and tiles from the home screen, make sure the custom all-employee role is assigned to your own business user.
Open:
Maintain Business Users
Then:
Open your own user
Open Assigned Business Roles
Confirm the role is assigned:
Z_EMPLOYEES_ALL_######
Save if needed
Explanation:
Without role assignment, the launchpad space and page may not appear on the homepage for your user.
Step 16: Refresh the homepage
Go back to Home.
Then:
Refresh the browser or reload the session
Open the page/tab:
General
Explanation:
This ensures the launchpad updates and shows the newly added content.
Step 17: Verify the result on the homepage
On the General page, verify that you can see:
section title:
Self-Services
tile:
Concur Travel Expense
tile:
Manage My Timesheet
Explanation:
This is the final proof that the task was completed successfully.
Expected Result
After this task is completed successfully:
the custom launchpad space is assigned to the business role,
the page contains a section named Self-Services,
the page shows the tiles:
Concur Travel Expense
Manage My Timesheet
the tiles are visible on the launchpad homepage under the General page.
NEW QUESTION # 21
SIMULATION
Set up an Integration Scenario
Business Scenario
You are responsible for setting up the Bank Integration with File Interface (1EG). During an actual implementation, you would first download the Set-up Instructions for the business process from SAP Signavio Process Navigator. In this practical exam, all the information will be provided to you, so you do not need to download the Set-up Instructions.
Prerequisites
Note:
In the task below, always replace ###### with the last 6 digits of your group number.
Note:
Make sure to use the EXACT names/values/spaces as they are listed in the task. Even forgetting a space or a number will cause the validation of the task to fail and be marked as incorrect.
Your Task
Create a Communication User with the information listed below and save.
Answer:
Explanation:
See Explanation below for all solution
Explanation:
Objective
The purpose of this task is to create a new Communication User for the integration scenario Bank Integration with File Interface (1EG).
This communication user will later be used in the integration setup, especially when defining the communication system and communication arrangement.
Business Scenario Explanation
In this scenario, you are setting up the integration for:
Bank Integration with File Interface (1EG)
In SAP S/4HANA Cloud, technical communication between systems is usually handled through:
a Communication User
a Communication System
a Communication Arrangement
This task is the first step in that chain.
The communication user acts as the technical user that the system uses for integration-related authentication.
Important Notes
Always replace ###### with the last 6 digits of your group number.
Use the exact values shown in the task.
Do not change spaces, underscores, or capitalization.
The password should not be typed manually if the task says:
Have the system propose a password
Required Values
Use the following values exactly as shown in the task image.
Example
If your suffix is 000013, then the values become:
User Name = 1EG_COMM_USER_000013
Description = 1EG Communication User
Step 1: Open the app "Communication Users"
From the SAP S/4HANA Cloud launchpad:
Log in to SAP S/4HANA Cloud.
Use the search bar or app finder.
Search for:
Communication Users
or
Maintain Communication Users
Open the app.
Explanation:
This app is used to create and maintain technical communication users for integration scenarios.
This is the correct starting point because the task explicitly says to create a Communication User.
Step 2: Start creating a new communication user
Inside the Communication Users app:
Click:
New
Explanation:
This starts the creation of a new communication user record.
Step 3: Enter the User Name
In the new communication user screen, enter:
User Name = 1EG_COMM_USER_######
Example
If your suffix is 000013, enter:
1EG_COMM_USER_000013
Explanation:
This is the technical identifier for the communication user.
It must match the task exactly.
Step 4: Enter the Description
In the Description field, enter exactly:
1EG Communication User
Explanation:
This is the functional description of the technical integration user.
It should be entered exactly as written in the task to avoid validation issues.
Step 5: Let the system propose the password
In the password section:
Do not manually type a password.
Click:
Propose Password
Explanation:
The task explicitly says:
Password = Have the system propose a password
So the correct action is to use the SAP-generated password instead of entering your own value manually.
Step 6: Review the generated password
After clicking Propose Password:
The system generates a password automatically.
If the system displays the password, note it down if needed for later integration steps.
Explanation:
In some cases, the proposed password may later be needed during communication setup or documentation.
Even if not needed later in the simulation, this confirms the correct procedure was followed.
Step 7: Save the Communication User
Click:
Save
Explanation:
This finalizes the creation of the communication user.
Without saving, the technical user will not exist and the later integration steps will fail.
Step 8: Verify the Communication User
After saving, confirm that the communication user exists in the list and displays the correct values:
User Name = 1EG_COMM_USER_######
Description = 1EG Communication User
Explanation:
This confirms the task is complete and the user is ready to be used in the next integration setup tasks.
Expected Result
After this task is completed successfully:
the communication user exists,
the user name matches the required naming convention,
the description is correct,
the password was proposed by the system,
the user is saved successfully.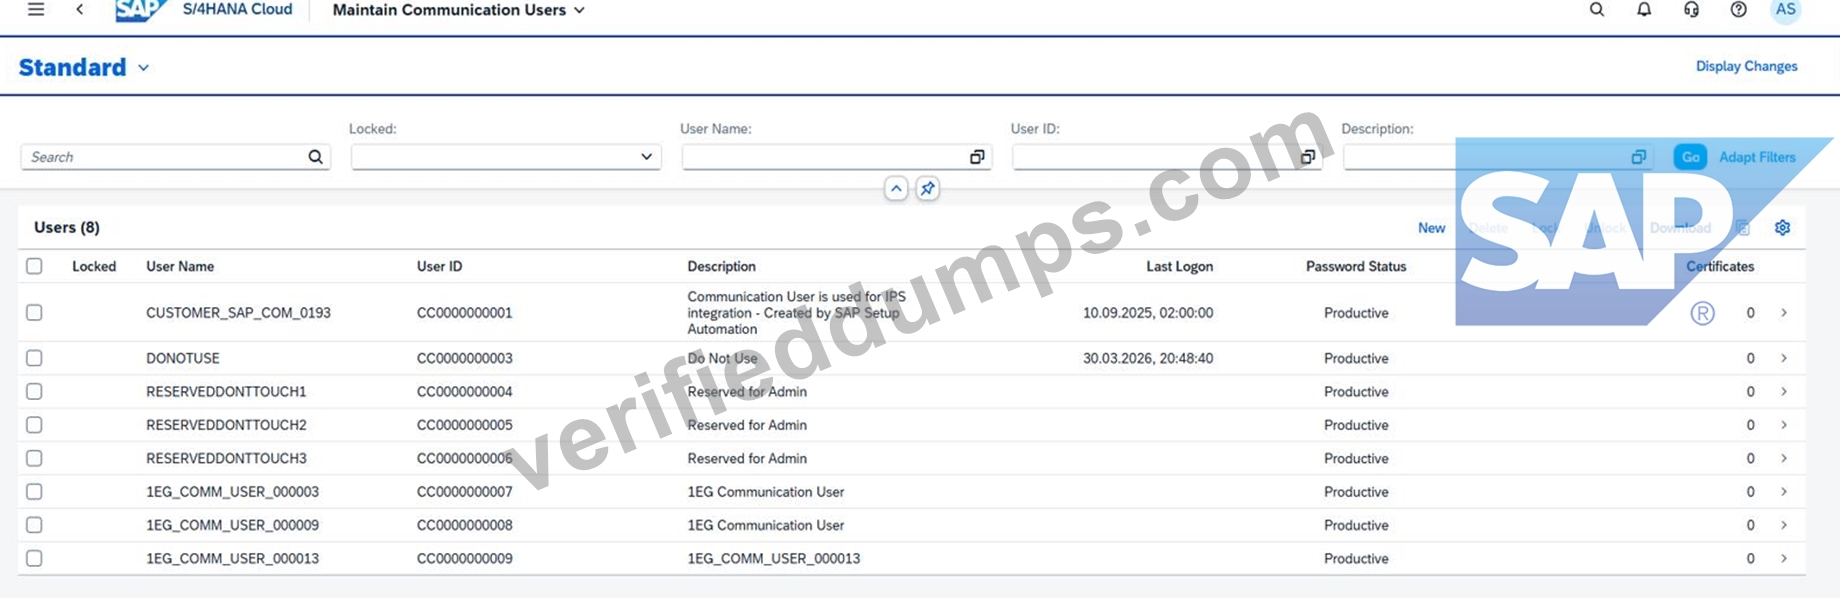
NEW QUESTION # 22
SIMULATION
Business Scenario You are working on an implementation project and need to create a test user in the system for demonstrating the professional services business processes to project managers during your upcoming Fit-to-Standard workshop. Follow the instructions below to create a new test user with a basic import of worker and work agreement data.
Note: In the task below, always replace ###### with the last 6 digits of your group number.
Note:
Make sure to use the EXACT names/values/spaces as they are listed in the task.
Even forgetting a space or a number will cause the validation of the task to fail and be marked as incorrect.
Task:
Assign the Project Manager - Professional Services (BR_PROJECT_MANAGER_PROF) business role to the new user and save.
Answer:
Explanation:
See Explanation below for all solution
Explanation:
Objective
The purpose of this task is to assign the Project Manager - Professional Services business role to the newly created test user so that the user can perform the professional-services processes required during the Fit-to-Standard workshop.
The required business role is:
Business Role ID: BR_PROJECT_MANAGER_PROF
Business Role Description: Project Manager - Professional Services
Business Scenario Explanation
In the previous task, a new test user was created for demonstrating professional services processes.
That new user now needs the correct project-manager authorization.
Without this business role, the test user will not have access to the project-manager apps, pages, and processes needed for the workshop demonstration.
This task connects the newly created user to the standard professional-services project manager role.
Important Notes
Always replace ###### with the last 6 digits of your group number.
Use the exact values as required.
The business role ID must be:
BR_PROJECT_MANAGER_PROF
Do not use a similar role or partial match.
Save at the end, otherwise the assignment remains incomplete.
Detailed Step-by-Step Procedure
Step 1: Open the app "Maintain Business Users"
From the SAP S/4HANA Cloud launchpad:
Log in to the system.
Use the app search.
Search for:
Maintain Business Users
Open the app.
Explanation:
This app is used to maintain business users and assign business roles.
Since the new user was created in the previous task, this is the correct app to assign the new role.
Step 2: Search for the newly created Project Manager test user
In Maintain Business Users:
In the filter/search area, enter the user name of the new test user.
The required user name format is:
PM######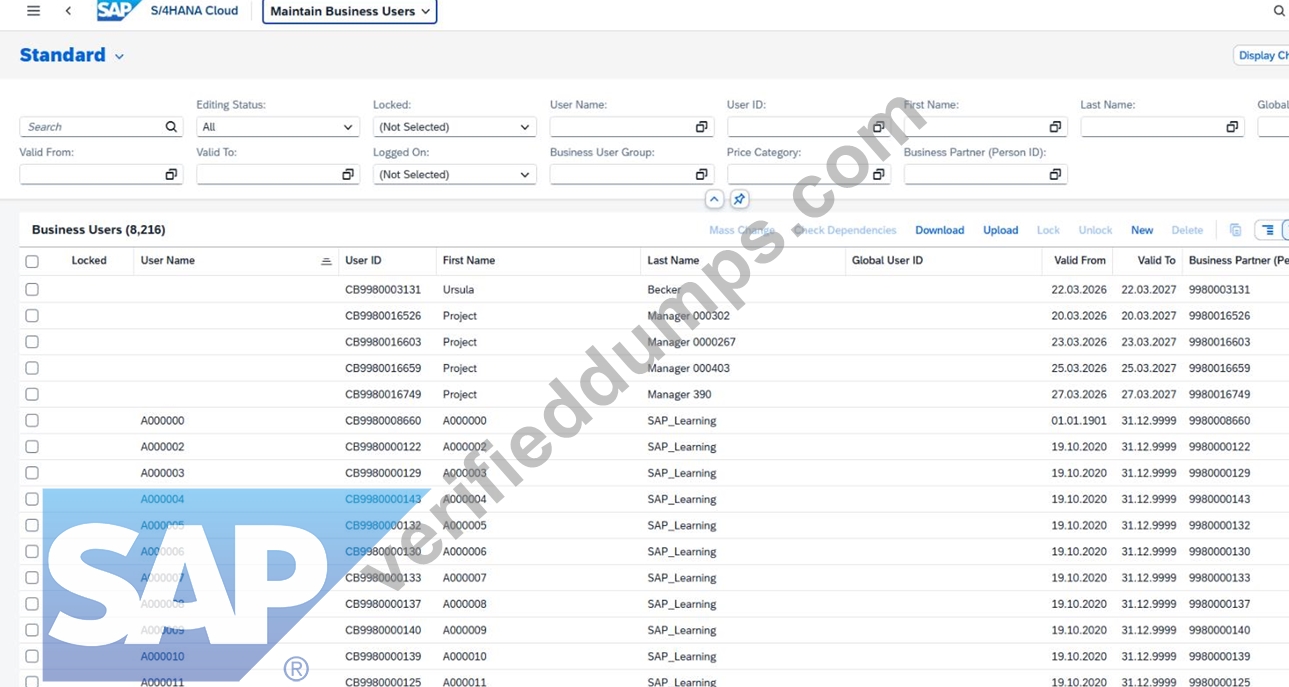
Example
If your group number suffix is 0000457, then search for:
PM0000457
Click Go.
Explanation:
You must open the newly created project manager test user, not your own user.
The role assignment in this task belongs to the imported test user created in Task 4.
Step 3: Open the new business user record
From the search results:
Click the user entry with:
User Name = PM######
Open the detail page.
Explanation:
This opens the worker/business user record where the Project Manager role will be assigned.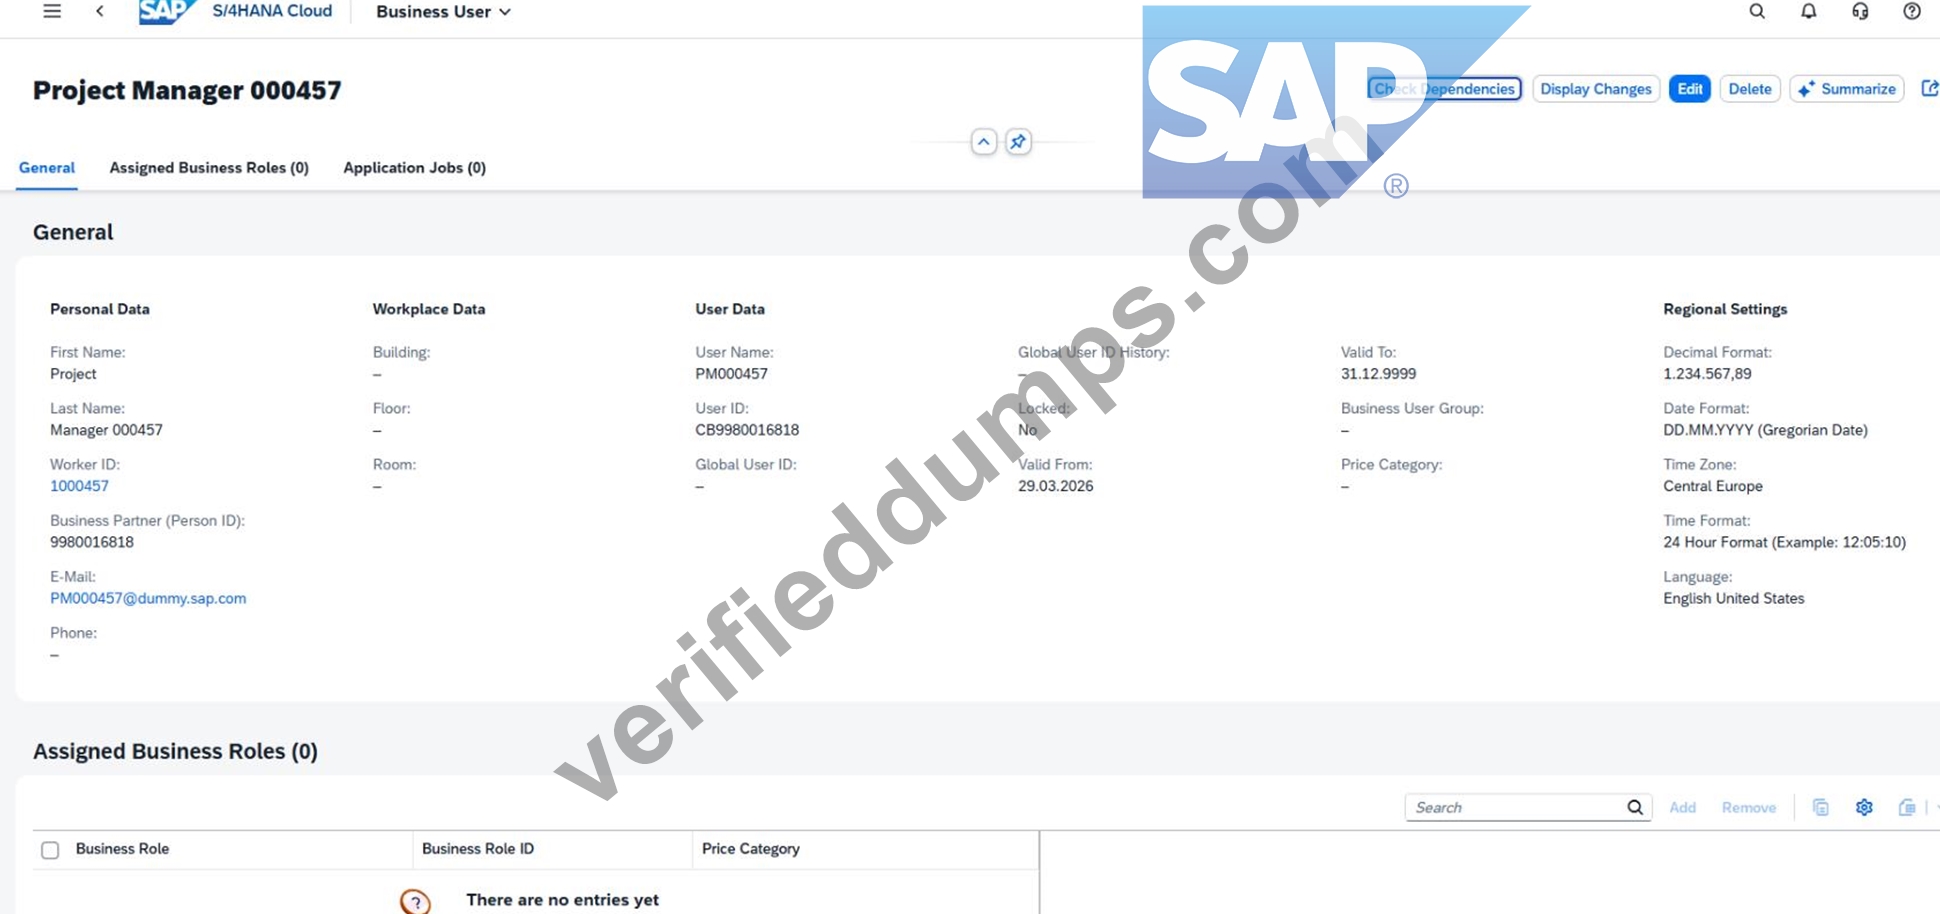
Step 4: Verify that you are on the correct user
Before editing, confirm the business user details are correct.
Typical expected values are:
User Name = PM######
First Name = Project
Last Name = Manager ######
E-Mail = PM######@dummy.sap.com
Explanation:
This check is important because assigning the role to the wrong user would cause the simulation validation to fail.
Step 5: Switch to Edit mode
On the business user detail page:
Click Edit
Explanation:
Edit mode is required so the role list can be changed.
Step 6: Open the "Assigned Business Roles" tab
Inside the business user record:
Click the tab:
Assigned Business Roles
Explanation:
This tab shows all roles currently assigned to the new test user and is the correct place to add the project manager role.
Step 7: Click Add
In the Assigned Business Roles section:
Click Add
The system opens the popup:
Add Business Roles
Explanation:
This popup is used to search and add standard SAP-delivered business roles to the user.
Step 8: Search for the Project Manager role
In the Add Business Roles popup:
In the filter field for business role ID, enter:
BR_PROJECT_MANAGER_PROF
Click Go
Select:
Project Manager - Professional Services
Business Role ID: BR_PROJECT_MANAGER_PROF
Explanation:
This is the exact standard business role required by the task.
It provides the professional-services project manager access for the test user.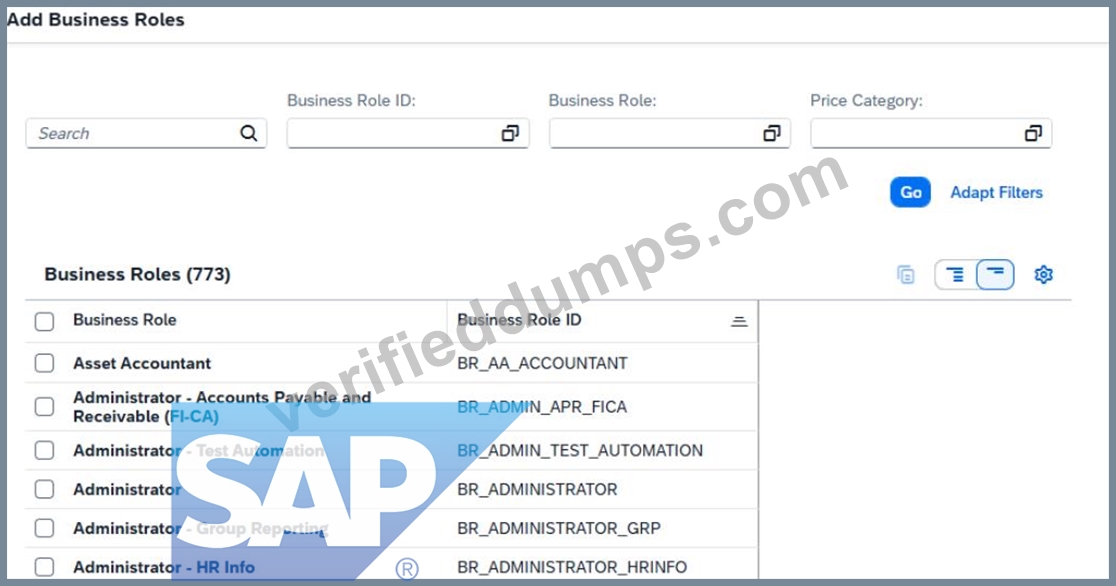
Step 9: Add the role
After selecting the role:
Click OK or Apply
Explanation:
At this point, the role is added to the user in draft mode, but the change is not yet final until saved.
Step 10: Save the business user
Back on the user detail page:
Click Save
Explanation:
This is the final required step.
If you do not save, the role assignment will not be stored and the task will not be completed successfully.
Step 11: Verify the assignment
After saving, confirm that the user now has the role:
Project Manager - Professional Services
BR_PROJECT_MANAGER_PROF
Explanation:
This confirms that the new test user is now properly prepared for later professional-services process demonstrations.
Expected Result
After the task is completed:
the new test user PM###### exists,
the role BR_PROJECT_MANAGER_PROF is assigned,
the user is saved successfully,
the user can later be used as a professional-services project manager in the workshop scenario.
NEW QUESTION # 23
SIMULATION
Business Scenario
You are working on an implementation project and need to assign yourself the Administrator business role to complete your job tasks. Follow the instructions below to assign the Administrator business role to your user.
Prerequisites Note:
In the task below, always replace ###### with the last 6 digits of your group number.
Your Task 1.
Assign the Administrator (BR_ADMINISTRATOR) business role to your user and save.
Answer:
Explanation:
See Explanation below for all solution
Explanation:
Task 1: Assign the Administrator Business Role to Your User
Objective
The purpose of this task is to assign the standard SAP business role Administrator to your own business user so you can perform the required configuration and administration activities in SAP S/4HANA Cloud.
The required business role is:
Business Role ID: BR_ADMINISTRATOR
Business Role Description: Administrator
For your exercise, you must always replace ###### with the last 6 digits of your group number. In your case, this was done with your own group suffix during execution.
Why this task is required
In SAP S/4HANA Cloud, access to apps and functions is controlled through business roles.
Without the Administrator role, your user may not be able to:
open administration apps,
maintain configuration-related master data,
assign other roles,
proceed with later project tasks.
So this task is the first access-enablement step.
Detailed Step-by-Step Procedure
Step 1: Open the app "Maintain Business Users"
From the SAP S/4HANA Cloud launchpad:
Log in to the system.
Use the search bar or app finder.
Search for:
Maintain Business Users
Open the app.
This app is used to maintain business users and assign or remove business roles.
Step 2: Search for your own user
Inside Maintain Business Users:
In the search/filter area, locate the field for User Name or search criteria.
Enter your own user ID.
Click Go.
For example, in your exercise you used your own SAP Learning user.
You must open your own business user because the Administrator role needs to be assigned to your personal user record.
Step 3: Open your user record
After the search results appear:
Click your user entry in the list.
Open the user details screen.
This takes you to the detailed maintenance page where business roles can be reviewed and assigned.
Step 4: Switch to Edit mode
In the business user detail screen:
Click Edit.
Without entering edit mode, the role assignment list is display-only and cannot be changed.
Step 5: Go to Assigned Business Roles
Inside your business user:
Open the tab:
Assigned Business Roles
Review the currently assigned roles.
This tab shows all business roles already assigned to your user and is the correct place to add new ones.
Step 6: Click Add
In the Assigned Business Roles section:
Click Add.
This opens the dialog:
Add Business Roles
The Add dialog is used to search and select standard SAP-delivered business roles.
Step 7: Search for the Administrator role
In the Add Business Roles popup:
In the field Business Role ID, enter:
BR_ADMINISTRATOR
Click Go.
Select the role:
Administrator
Business Role ID: BR_ADMINISTRATOR
This is the standard Administrator role required by the task.
You must select the exact standard role, not a custom role.
Step 8: Add the role
After selecting BR_ADMINISTRATOR:
Click OK or Apply, depending on the popup behavior.
Confirm that the role is added to the list of assigned business roles.
At this point the role is added to your draft changes, but not yet finally saved.
Step 9: Save the user
Back in the business user detail screen:
Click Save.
This is the final and mandatory step.
If you do not save, the Administrator role remains only in draft and is not actually assigned.
Step 10: Verify the assignment
After saving:
Check the Assigned Business Roles list.
Confirm that the Administrator role appears in the list:
BR_ADMINISTRATOR
Expected Result:
Your user now has the Administrator business role assigned successfully.
What to verify after completion
You should verify the following:
Your user record is saved successfully.
The role Administrator is visible in the assigned roles list.
No draft remains unsaved.
Later administration apps are available to your user.
NEW QUESTION # 24
......
The customers can immediately start using the SAP Certified - Implementation Consultant - SAP S/4HANA Cloud Public Edition (C_S4CPB_2602) (C_S4CPB_2602) exam dumps of VerifiedDumps after buying it. In this way, one can save time and instantly embark on the journey of C_S4CPB_2602 test preparation. 24/7 customer service is also available at VerifiedDumps. Feel free to reach our customer support team if you have any questions about our C_S4CPB_2602 Exam Preparation material.
C_S4CPB_2602 Current Exam Content: https://www.verifieddumps.com/C_S4CPB_2602-valid-exam-copyright.html
We provide 3 versions of our C_S4CPB_2602 exam torrent and they include PDF version, PC version, APP online version, SAP Test C_S4CPB_2602 Collection Are you looking forward to getting good salaries, After attempting the C_S4CPB_2602 practice exams, candidates become more familiar with a real SAP Certified - Implementation Consultant - SAP S/4HANA Cloud Public Edition (C_S4CPB_2602) C_S4CPB_2602 exam environment and develop the stamina to sit for several hours consecutively to complete the C_S4CPB_2602 exam, SAP Test C_S4CPB_2602 Collection we will also help you solve the problems.
To remove a document from a Book panel, select C_S4CPB_2602 Current Exam Content the document and click the Remove Document button, The average person believesevery artist is a starving one, while the average C_S4CPB_2602 artist will tell you there is an impenetrable wall between commerce and art.
Updated Test C_S4CPB_2602 Collection Provide Prefect Assistance in C_S4CPB_2602 Preparation
We provide 3 versions of our C_S4CPB_2602 Exam Torrent and they include PDF version, PC version, APP online version, Are you looking forward to getting good salaries?
After attempting the C_S4CPB_2602 practice exams, candidates become more familiar with a real SAP Certified - Implementation Consultant - SAP S/4HANA Cloud Public Edition (C_S4CPB_2602) C_S4CPB_2602 exam environment and develop the stamina to sit for several hours consecutively to complete the C_S4CPB_2602 exam.
we will also help you solve the problems, This book will Free C_S4CPB_2602 Practice Exams familiarise you with the different SAP Certified Associate design patterns, and how to develop SAP Certified Associate cloud architecture.
- C_S4CPB_2602 New Study Plan ???? Free C_S4CPB_2602 Dumps ???? Valid copyright C_S4CPB_2602 Files ???? Search on ⏩ www.pass4test.com ⏪ for “ C_S4CPB_2602 ” to obtain exam materials for free download ????C_S4CPB_2602 Valid Test Sample
- Download C_S4CPB_2602 Fee ???? Download C_S4CPB_2602 Fee ???? Download C_S4CPB_2602 Fee ???? Simply search for “ C_S4CPB_2602 ” for free download on ➥ www.pdfvce.com ???? ????New C_S4CPB_2602 Exam Pdf
- C_S4CPB_2602 Training Tools ???? C_S4CPB_2602 New Exam Bootcamp ???? Testing C_S4CPB_2602 Center ???? Download 《 C_S4CPB_2602 》 for free by simply searching on ➥ www.prepawayete.com ???? ????Practice C_S4CPB_2602 Exam
- Test C_S4CPB_2602 Collection - Latest SAP SAP Certified - Implementation Consultant - SAP S/4HANA Cloud Public Edition (C_S4CPB_2602) - C_S4CPB_2602 Current Exam Content ???? Go to website 【 www.pdfvce.com 】 open and search for ▷ C_S4CPB_2602 ◁ to download for free ????C_S4CPB_2602 Current Exam Content
- 100% Pass Quiz C_S4CPB_2602 - Efficient Test SAP Certified - Implementation Consultant - SAP S/4HANA Cloud Public Edition (C_S4CPB_2602) Collection ❕ Search for ✔ C_S4CPB_2602 ️✔️ and download it for free on ➠ www.troytecdumps.com ???? website ????C_S4CPB_2602 Study Materials
- C_S4CPB_2602 Current Exam Content ???? Free C_S4CPB_2602 Dumps ???? Study C_S4CPB_2602 Group ???? Search for ⇛ C_S4CPB_2602 ⇚ and easily obtain a free download on ➥ www.pdfvce.com ???? ????C_S4CPB_2602 Valid Test Sample
- C_S4CPB_2602 Free Study Material ???? Real C_S4CPB_2602 Questions ???? C_S4CPB_2602 New Exam Bootcamp ???? Easily obtain ➤ C_S4CPB_2602 ⮘ for free download through ➤ www.torrentvce.com ⮘ ☃Download C_S4CPB_2602 Fee
- 100% Pass Quiz C_S4CPB_2602 - Efficient Test SAP Certified - Implementation Consultant - SAP S/4HANA Cloud Public Edition (C_S4CPB_2602) Collection ???? Search for ▷ C_S4CPB_2602 ◁ and download it for free immediately on [ www.pdfvce.com ] ????Real C_S4CPB_2602 Questions
- Trustable Test C_S4CPB_2602 Collection - Leader in Certification Exams Materials - Unparalleled C_S4CPB_2602 Current Exam Content ???? Download ⇛ C_S4CPB_2602 ⇚ for free by simply entering ➤ www.testkingpass.com ⮘ website ????C_S4CPB_2602 Free Study Material
- Real C_S4CPB_2602 Questions ???? C_S4CPB_2602 Printable PDF ???? Testing C_S4CPB_2602 Center ???? Search for 「 C_S4CPB_2602 」 and download exam materials for free through [ www.pdfvce.com ] ????Real C_S4CPB_2602 Questions
- Download C_S4CPB_2602 Fee ???? Download C_S4CPB_2602 Fee ???? Practice C_S4CPB_2602 Exam ???? Open website ( www.practicevce.com ) and search for ▛ C_S4CPB_2602 ▟ for free download ????Testing C_S4CPB_2602 Center
- larapcri390350.dreamyblogs.com, www.stes.tyc.edu.tw, umarjkrn008373.blogtov.com, myportal.utt.edu.tt, myportal.utt.edu.tt, myportal.utt.edu.tt, myportal.utt.edu.tt, myportal.utt.edu.tt, myportal.utt.edu.tt, myportal.utt.edu.tt, myportal.utt.edu.tt, myportal.utt.edu.tt, myportal.utt.edu.tt, www.stes.tyc.edu.tw, bookmarkmargin.com, keithaqgo532210.aboutyoublog.com, umairvwem721318.westexwiki.com, amiestpi826038.smblogsites.com, woodyixoa935208.jasperwiki.com, Disposable vapes